
Using the Selection Constraints tab, you will be able view and enable/disable the the restrictions that control the number of times opportunities can be selected by the optimizer, and the time frame in which selections occur.
Remember, values in this table don't represent the selections themselves; but instead represent per-period availability of selections. Additionally, selections can be modified from within the software — but are generally imported with the rest of the Input Data.
The selection constraints table is divided into four sections:
- The Integer flag
- Total
- Total instances
- Period-to-period selection constraints
The Integer Flag
When an opportunity's Integer flag is enabled, the optimizer won't be able to make partial selections for the opportunity. Integer selections are optional, and will extend optimization time — but they are sometimes the only option that makes operational sense. For example, a treating facility cannot be half-built, so you wouldn’t want a partial selection for such an opportunity. In many PSAs, there is no viable option to invest in opportunities with variable working interest.
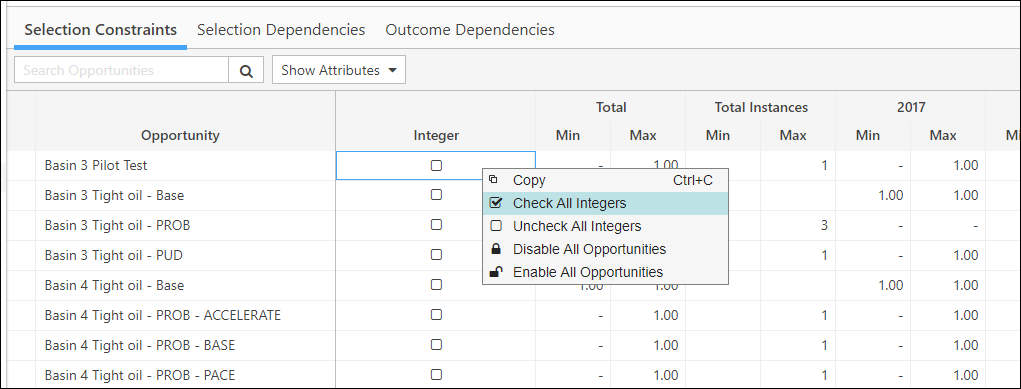
You can toggle all of the integer flags at once (for the opportunities that are currently displayed in the table) by right-clicking on the table and selecting Check All Integers.
Click image to expand or minimize.
If you apply a filter before clicking Check All Integers (or Uncheck All Integers), only the opportunities that are displayed will be modified.
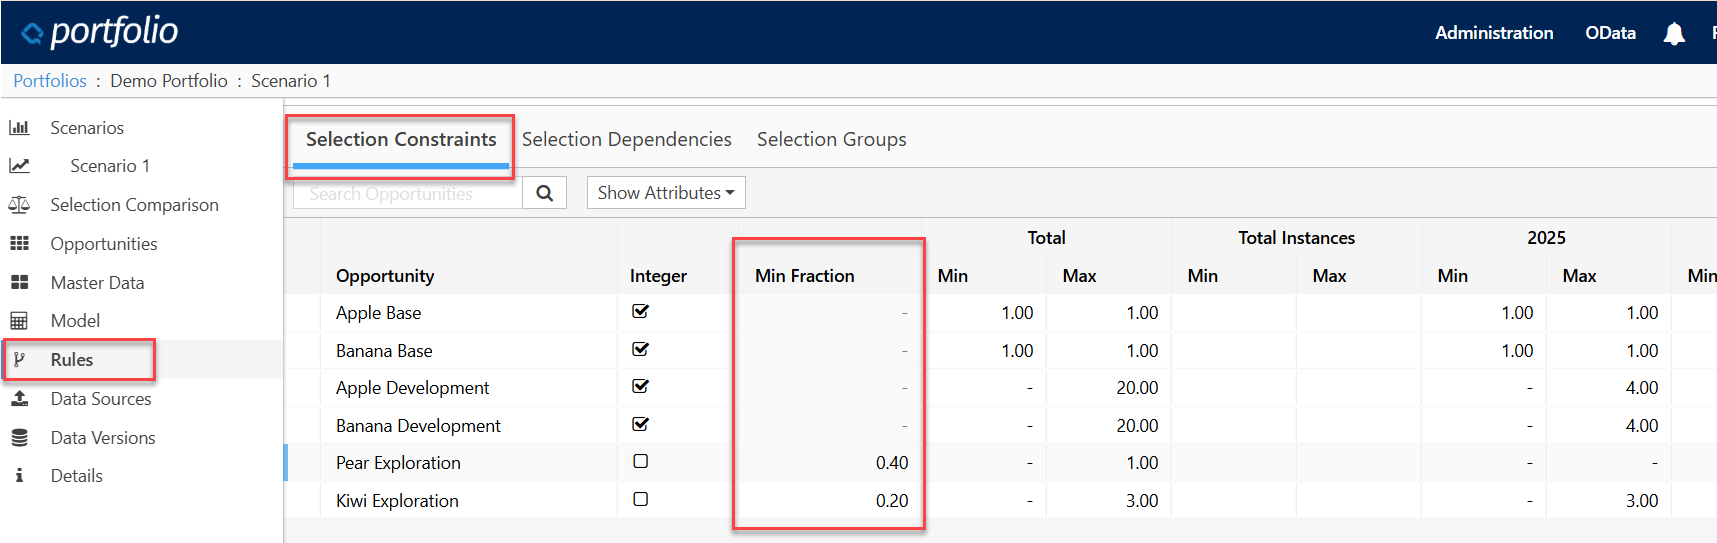
Min Fraction
Min Fraction allows the user to refine the Selection Constraints for each opportunity. The Min Fraction feature allows the user to specify the minimum quantity that must be selected IF the opportunity is selected (Min Fraction does not mandate selection of the opportunity).
Min Fraction applies only when non-integer selection is allowed and thus is disabled whenever the Integer selection is checked.
Click image to expand or minimize.
Min Fraction applies per instance. If an opportunity is selected in multiple time periods, the minimum applies each time. If an opportunity is selected multiple times in a time period, the limit applies to each multiple. For the Kiwi Exploration example above, a selection in the first period must be between 0.2-1, 1.2-2, or 2.2-3. Selection of 0.19, 1.19, or 2.19 would not be allowed because each whole selection is treated as one instance.
Total
The minimum (Min) and maximum (Max) values you enter in the Total column create Selection Constraints that apply to the entire length of time being considered for new selections in the model, limited only by the number of eligible time periods. A Max or Min value listed in the Total column does not place a constraint on particular time period, but rather on all the time periods in aggregate. For example, if the total maximum is set to 50, the optimizer can only a maximum of 50 selections across all eligible time periods.
Total Instances
The Instances section adds an additional requirement to the Total constraint. When you add Min and/or Max instances values to the table, then each selection in a time period counts as an instance of a selection, regardless of whether that selection is fractional or whole. For example, a time period selection of 0.5 counts as one instance, as does a selection of 1.0. A selection of 1.1 counts as two instances, and so on. Values you enter in this column will force the optimizer to select a minimum or maximum number of instances. This feature is useful when we are choosing Opportunities in which our company has only partial interest, but which have limitations on how many times they may be chosen. Values in this column can be left blank.
Period-to-Period Selection Constraints
Finally, a column will be listed for each period in your portfolio. Minimum (Min) values in these columns specify the minimum number of times the optimizer must select the opportunity in the period. Only opportunities with minimum values have to be selected by the optimizer. Maximum (Max) values in these columns specify the maximum number of times the opportunity can be selected in the period.
Enable/Disable Opportunities
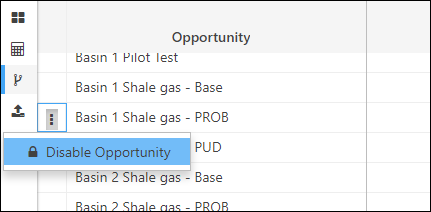
To enable or disable opportunities:
- Hover over the opportunity you wish to enable/disable, and click the Options icon (
 ) next to the opportunity's name.
 - Click the Enable Opportunity/Disable Opportunity button (depending on the current state of the opportunity).
Click image to expand or minimize.
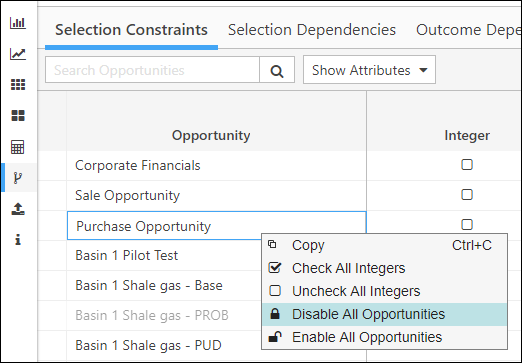
Text in rows that correspond with disabled opportunities will be displayed in gray.
- You can enable or disable all of the opportunities in the table in one step. To do this, right-click on a cell in the Selection Constraints table and select Disable All Opportunities or Enable All Opportunities.
Click image to expand or minimize.
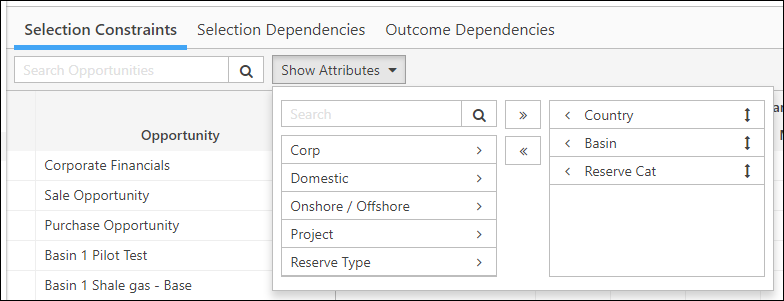
Adding Attributes to the Selection Constraints Table
You can add attributes to the Selection Constraints table to help filter and search for opportunities.
To add attributes to the table:
- Click the Show Attributes button near the top of the table. The Show Attributes popup will open.
- All of the available attributes will be listed on the left side of the popup. Click the Add button (
 ) next to an attribute's name to add it to the table. Click the Add All button (
 ) to add all of the attributes to the table in one step.
 - To reorder the list of attributes, click and hold the Reorder icon (
 ) next to the attribute you wish to move, and then drag and drop it onto a new position in the list.
 - Click on the table to close the Show Attributes popup. The attribute columns you selected will be displayed in the table.
Click image to expand or minimize.